Creating and Managing Document Generation Templates
This is an add-on feature for Source to Contract and requires an existing Adobe Document Generation subscription.
Overview
Source to Contract leverages the Adobe document generation API, enabling System admins to design custom reusable templates. These templates automatically extract data from Source to Contract records, allowing users to generate complete documents with a single click. The generated documents can be formatted as either MS Word or Adobe PDF files.
Administrators can create reusable user templates in four simple steps:
- Download the relevant JSON file from Command Centre.
- Upload the JSON file into an MS Word document.
- Tag the input data fields in your MS Word document.
- Upload the MS Word document back to the Command Centre.
After a fully customized and tagged document is uploaded into the Source to Contract system, users can generate documents effortlessly by clicking a button in the record’s ‘Document’ category.
Getting started
Installation of Adobe Add-in
For System administrators to create document generation templates, the Adobe Document Generation add-in must be installed in Microsoft Word. This add-in is available for free from Adobe.
There are several ways to install this add-in, but the easiest method is to download it from the Microsoft Store. Click the link below to access the add-in in the Microsoft Store.
Microsoft Store | Adobe Document Generation for Word
If your organization restricts this installation method, or if you are using a web-based version of Office or an operating system other than Windows, click the link below for comprehensive installation options and instructions from Adobe.
Word Add-in | Document Generation API | Adobe PDF Services
Once the Adobe add-in has been installed correctly, it should be available as an icon on the ‘Home’ toolbar with Word.

Downloading JSON files
The initial step in creating document generation templates is to download the JSON file for the relevant module where the document will be generated. For instance, if the template is meant to display a contract summary, including its description and stakeholders, you will need the Contract JSON file.
The JSON file for a Source to Contract module informs the Adobe Document Generation add-in about the specific data fields from Source to Contract that can be tagged. Tagging these fields inserts dynamic elements into the MS Word document.

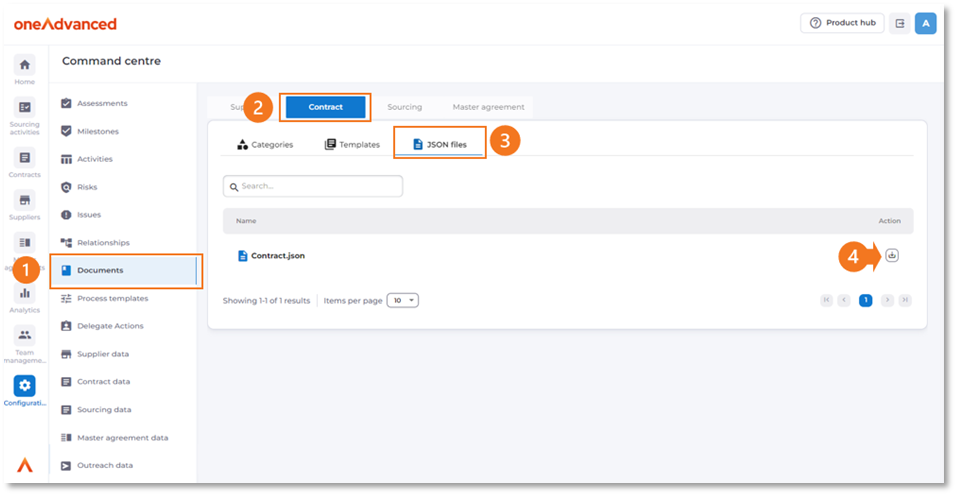
To download the JSON file for a module, go to the ‘Document’ category in Command Centre. Click on the relevant module’s tab, then select the ‘JSON files’ tab and click the download button next to the file.
Uploading the JSON file
Once the JSON file is downloaded, it can be uploaded to the Adobe Document Generation add-in to begin tagging.
There are two ways to start this process:
- If your organization already has an MS Word document that you want to tag (insert dynamic fields), open that document.
- If you are starting from scratch, create a new blank MS Word file.
Regardless of whether you are updating an existing document or starting from scratch, open the Adobe Document Generation add-in panel by clicking its icon in the ‘Home’ toolbar.

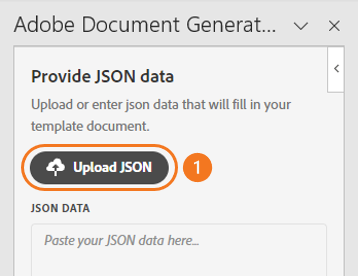
You may be provided a welcome message from Adobe, if so click the ‘Get started’ button and continue until you see the ‘Upload JSON’ button. Click this button and locate the downloaded JSON.
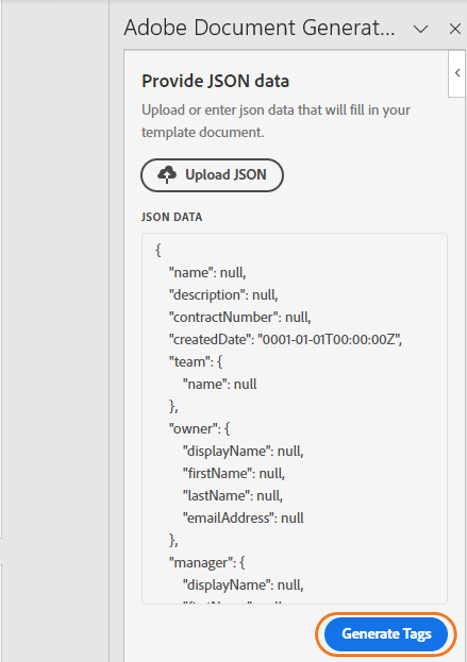
Once you have uploaded the JSON file you should see some of the sample JSON data. Click the ‘Generate Tags’ button to start tagging your document.
Tagging the MS Word document
When tagging your MS Word document with data, you can use two types of tags: Basic and Advanced.
- Basic tags: These let you insert a single field element, such as the contract title, directly into your document.
- Advanced tags: These offer more complex functionalities, including adding tables and lists, incorporating conditional content, and performing basic numerical calculations.
Basic tags
To insert a basic tag in your Word document, follow these steps:
- Place the cursor where you want the tag to appear.
- Click on the Basic tab.
- Use the search tags section to type and filter or scroll through the list of available tags.
- Select the desired tag.
- Click the Insert text button.
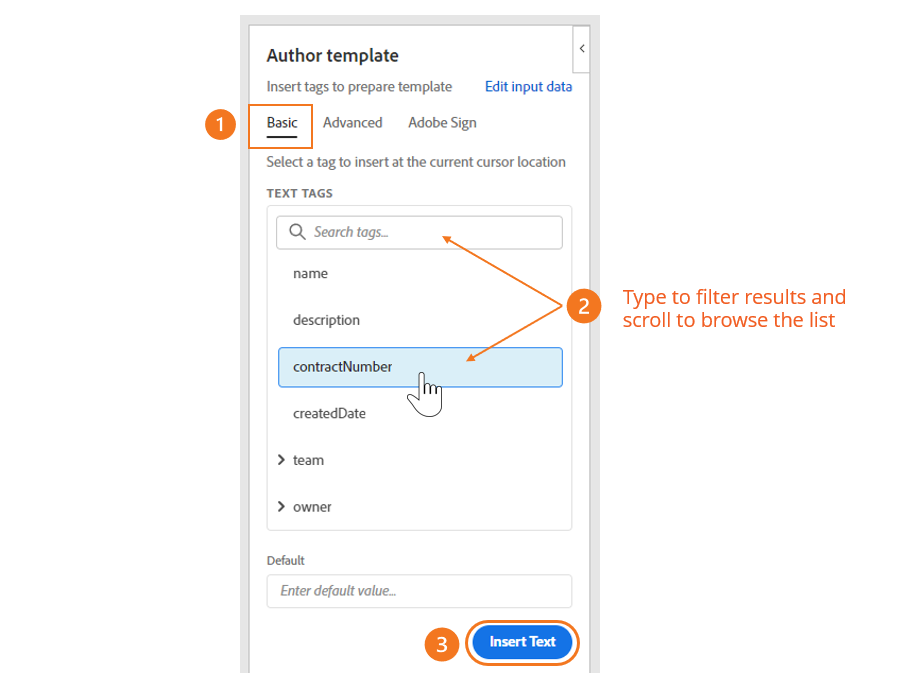
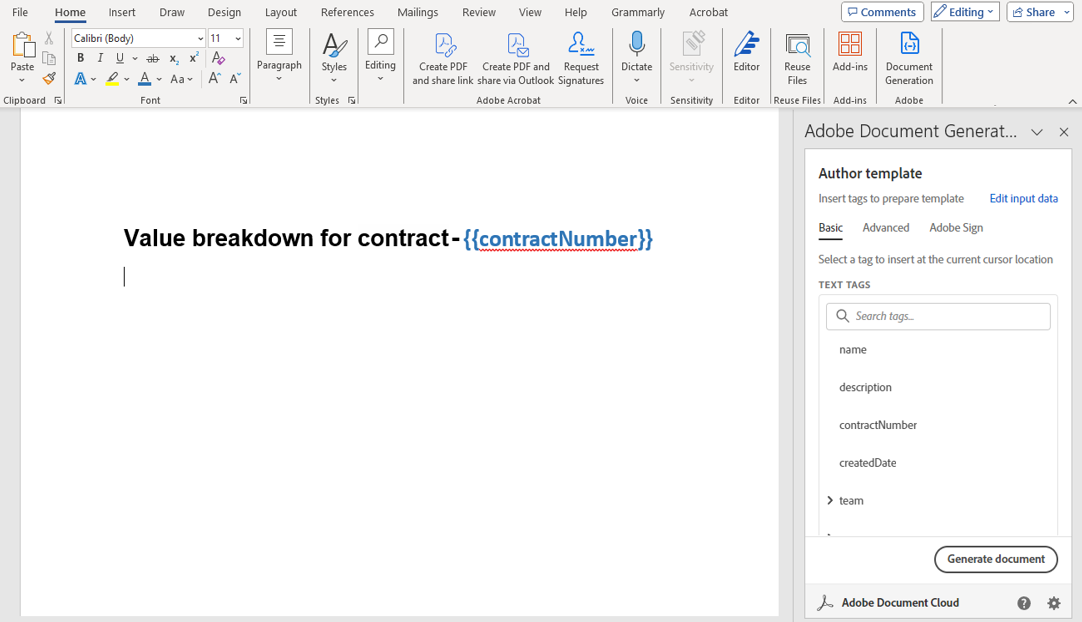
Once a tag is inserted into the document it will appear enclosed in double curly brackets {{ }}.
The tags can be formatted with fonts and colour's just like normal document text.
Advanced tags
Advanced tags enable the inclusion of related data from Source to Contract, which can be displayed in tables and lists. Additionally, we can set conditions to determine whether specific text appears in the document based on the value of a Source to Contract field, a feature known as ‘conditional content’. Finally, numeric tags allow for simple calculations to be performed.
Tables and Lists
Table and list tags enable the inclusion of related data from Source to Contract in MS Word, displayed in a column and row format using table or bullet/number list layouts. Examples of data suitable for advanced table and list displays include the breakdown of a sourcing activity/contract value over years or cost centers, or a list of stakeholders associated with a sourcing activity/contract.
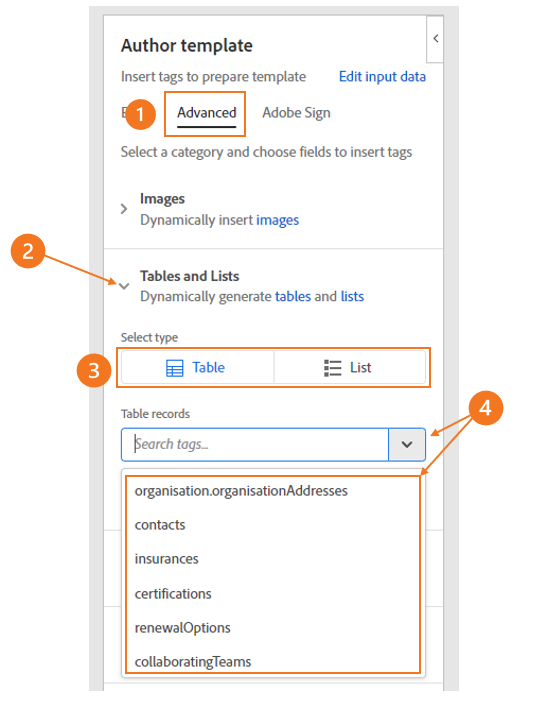
To add a Table or list:
- Click the ‘Advanced’ table in the Adobe document generator add-in
- Expand the ‘Tables and lists’ section
- Select whether you would like the data displayed as a table or list
- Click the dropdown and select the collection of data eligible to be displayed as a table or list from Source to Contract
After selecting an eligible data collection to display, you can choose which columns of data to insert. For example, the ‘insurances’ table from a contract includes two columns: ‘insurance name’ and ‘insurance value’. You can opt to display one or both columns.
To select columns, click the ‘select columns records’ field and either start typing or press the space bar to view available columns. Click on a column to add it to the tag list; the order in which columns are tagged will determine their display order in the table or list. To remove a column, click the ‘x’ next to the selected column.
Once tables and lists are inserted into the document, you can customize fonts, table colors, table headings, and bullet styles to match the document’s style.
Depending on whether ‘Table’ or ‘List’ is chosen as the display format, data columns will be presented from left to right. In a table layout, headings will appear at the top of each column, while in a list layout, data columns will be displayed left to right within a single bullet or numbered line, with the column heading preceding the data.
The example below illustrates the comparison for the contacts table/list using first name, last name, and email.
Table
FIRSTNAME | LASTNAME | |
{{contacts.firstName}} | {{contacts.lastName}} | {{contacts.email}} |
List
{% repeating-section contacts %}
- firstName: {{firstName}}, lastName: {{lastName}}, email: {{email}}
{% end-section %}
When inserted into a document template, both tables and lists will initially display as a single line item. However, once the document is generated, rows will be created based on the associated data.
For the list format, it is crucial not to edit or remove the %repeating-sections% and %end section% lines, as these lines are necessary for generating additional rows.
● {{firstName}} {{lastName}} – {{email}}
Conditional content
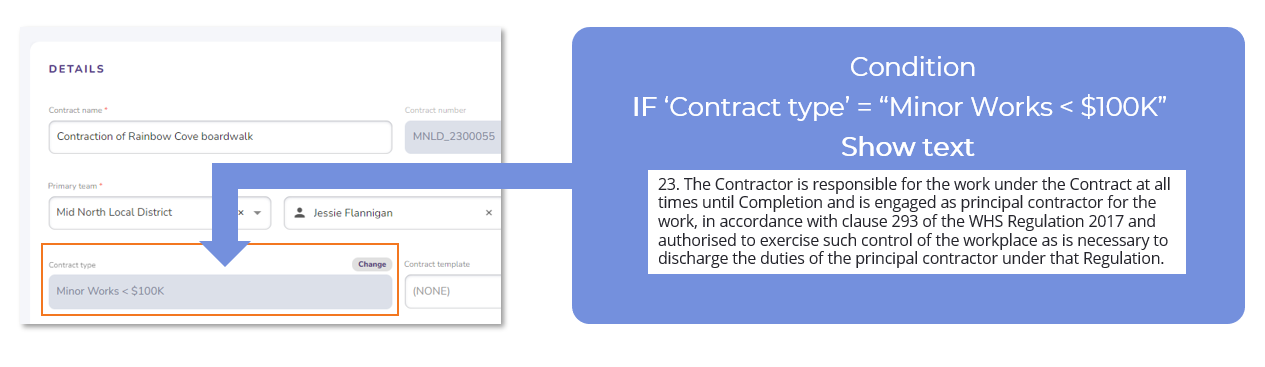
The document generation feature can also hide or display sections of static text based on whether a field is populated or specific values in a Source to Contract field.
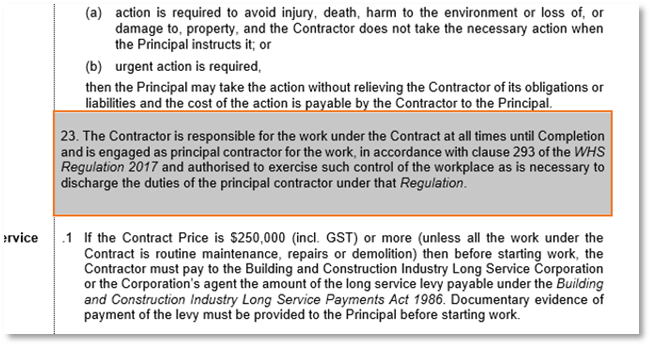
For example, you can show or hide text in a template that applies only to a specific type of contract. Instead of creating a separate document template for this contract type, you can configure the template to display “Item 23” only if the contract type name is “Minor Works < $100K”.
There are two types of content that can be conditionally hidden or shown in a document template:
- Section: Used to control a large portion of a document, such as paragraph headings or other Word content.
- Phrase: Used to conditionally show or hide a single sentence or specific words within a template.
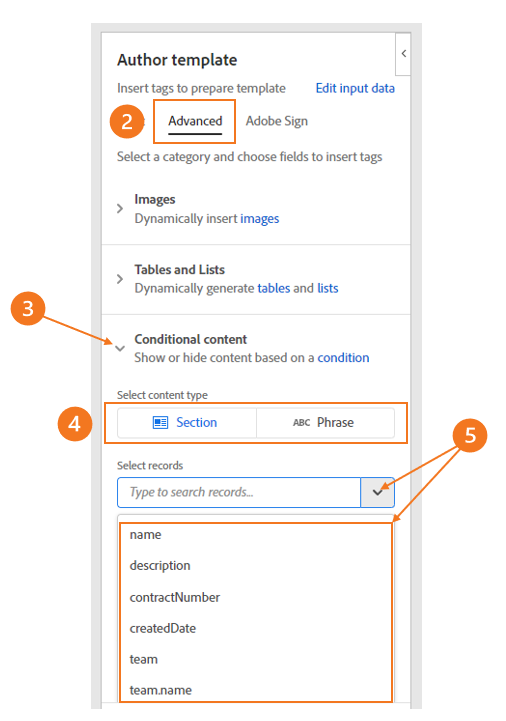
To add conditional content:
- Select the section of text or phrase you want to make conditional in the Word document
- Click the ‘Advanced’ table in the Adobe document generator add-in
- Expand the ‘Conditional content’ section
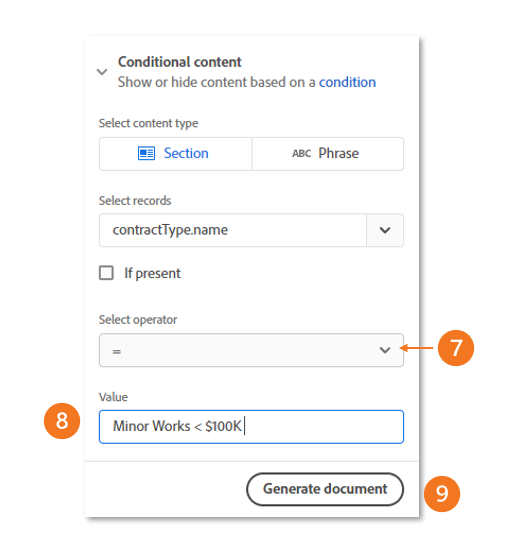
- Select whether you would like to make a ‘Section’ of the document condition or a ‘Phrase’
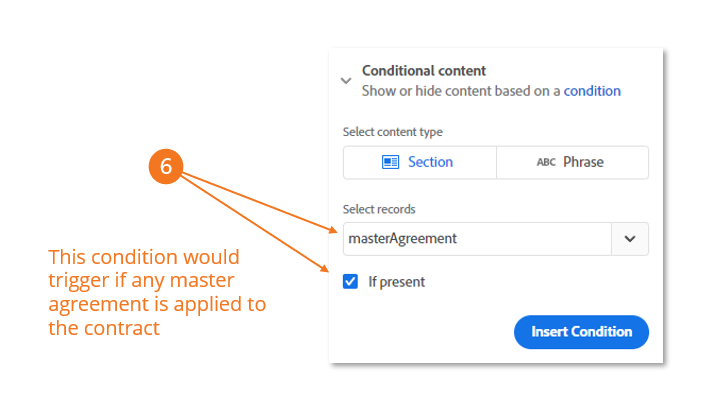
- Click the dropdown and select the field from Source to Contract which will dictate the condition
- If you would like the condition to trigger based on the event that a field is NOT blank (empty) click the ‘If present’ checkbox
- Alternatively, leave ‘If present’ unchecked, and select whether the field value triggers the condition when it is equal to/or not equal to the ‘value’ field using the ‘Select operator’ dropdown
- Enter the text/numbers to trigger the condition in the ‘Value’ field
- Click the ‘Generate Document’ button