Requesting eSignatures on documents
This is an add-on feature for Source to Contract and requires an existing Adobe Sign subscription.
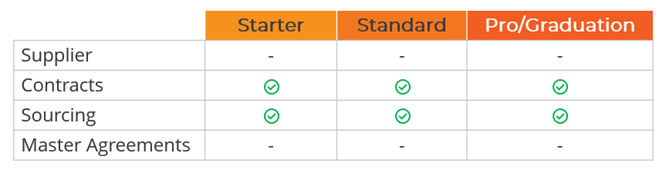
This feature applies to the following subscriptions when enabled:
Overview
Source to Contract utilises the Adobe Sign API, allowing users with the ‘eSign’ role to request signatures and complete other fields on most document types. Multiple signers can be added and ordered in the signing process. Additionally, other parties can be designated to receive the final copy of the documents once the signing process is complete.
Assigning 'eSigner' role
There are four main steps in the document signing process:
- Adding or selecting an existing document for signing.
- Designating signers and other recipients.
- Authoring the document.
- Sending and managing the signing process
Adding or selecting documents for signing
Users with the ‘eSign’ role can request signatures for documents in the ‘General Documents’ section of sourcing activities and contracts.
When a document is added to the ‘General Documents’ section (either by using the ‘+ Document’ button or the ‘Generate’ button, if the Adobe document generation add-on is enabled), a blue signature icon will appear next to document types that support eSigning.
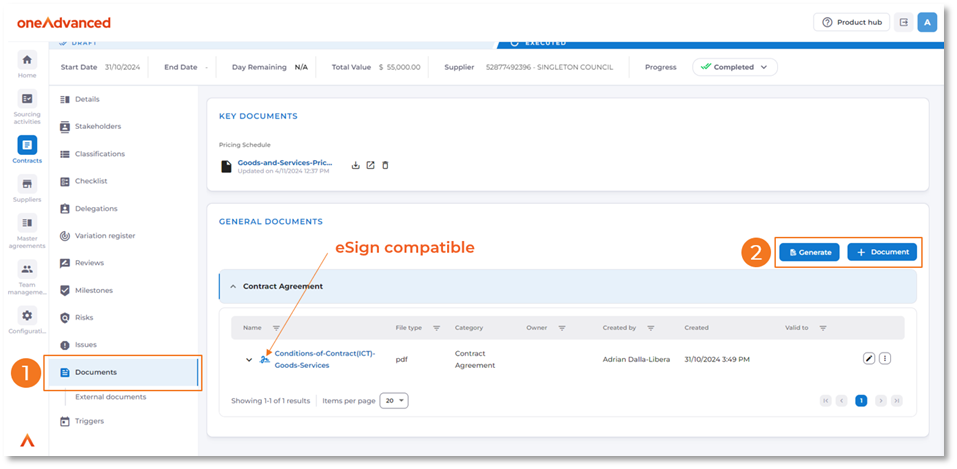
File Compatibility
To start the request process for a compatible document:
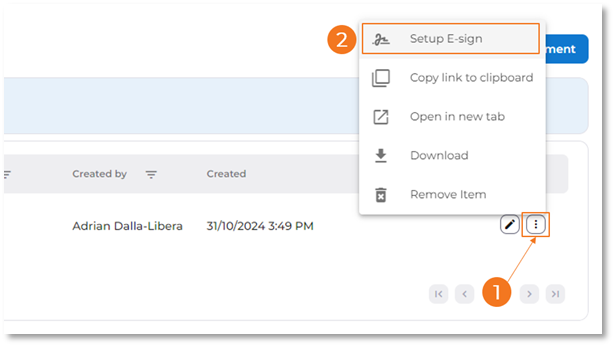
- Click on the ellipse button to the right of the document
- Select “Setup E-sign”.
Designating signers and other recipients
After clicking ‘Setup E-sign’, the E-sign popup window will appear. This window allows you to add signers and additional recipients, customize the message, and attach any associated documents.
- Enter the email addresses of individuals who need to sign the document or fill out a field. Use the ‘+ Add signer’ button to include more email addresses. The order in which the addresses are listed determines the sequence for completion. You can reorder the addresses using the drag handles.
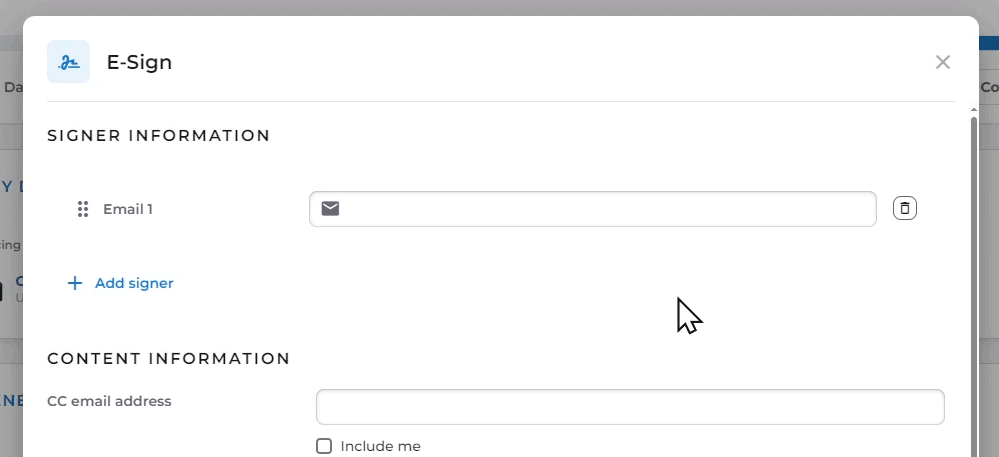
- The ‘CC email address’ field lets you enter recipients who should receive only the final copy of the completed/signed document. You can enter multiple email addresses in this field. For convenience, click the “include me” checkbox to automatically add the email address associated with your current login.
- In the mail message field, add any text that will assist with the signing process. This text will appear in two locations: in the email the signers receive, requesting action, and in the signing user interface that appears when the user opens the email link.
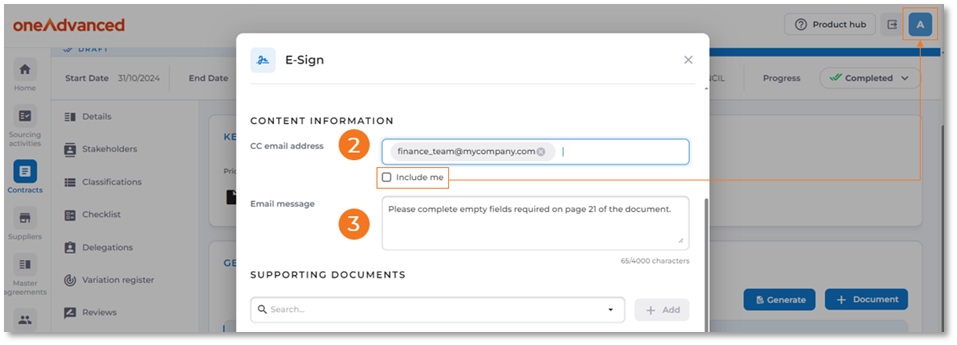
- Lastly, include any supporting documentation that should be available for signers to review. You can search by typing or expand the drop-down to select from a list. All documents attached to the record are available, including key documents. External documents linked to the record cannot be used.

Once you are ready to continue, you have two options. Click ‘Save’ to save the settings without proceeding to the next step of authoring the document with signature locations and additional input fields. Or, if you are ready, click ‘Submit for authoring’.
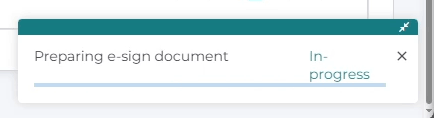
After clicking ‘Submit for authoring’, a progress indicator will appear in the bottom right corner of the view. This indicator shows the progress of uploading the document and its settings to the Adobe Sign service. While the indicator is active, you can continue to work and navigate within Source to Contract without interrupting the upload process. The process is complete when ‘Done’ is displayed.
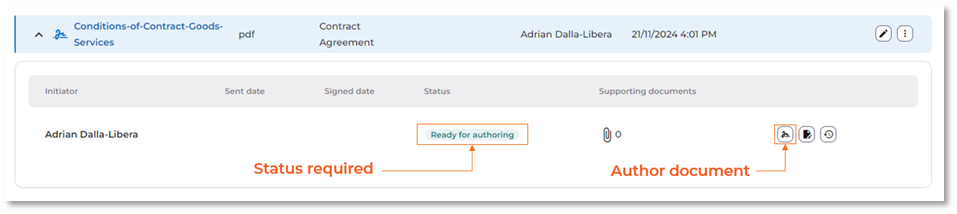
Authoring the document
The step of authoring the document involves setting up signature fields and other field types in the document being used for signing.
To initiate the authoring process for a document, you need to click the ‘Submit for authoring’ button (as mentioned above). Once this is done, the document’s status will change to ‘Ready for authoring’.
The video below demonstrates how to use the authoring overlay to add basic signature and text fields for completion.
Sending and managing the signing process
Once the authoring is complete, the document’s status changes to ‘In progress’ and it will be sent to the signers in sequential order for completion. The sent date field will be date stamped, to indicate when the document was sent for the first signature.

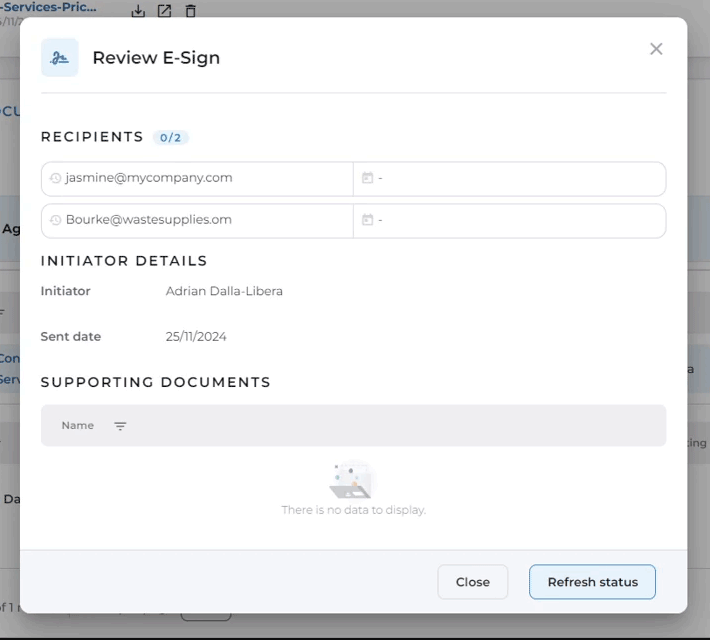
Checking progress
The progress of the signing process can be reviewed by clicking the ‘view details’ button.
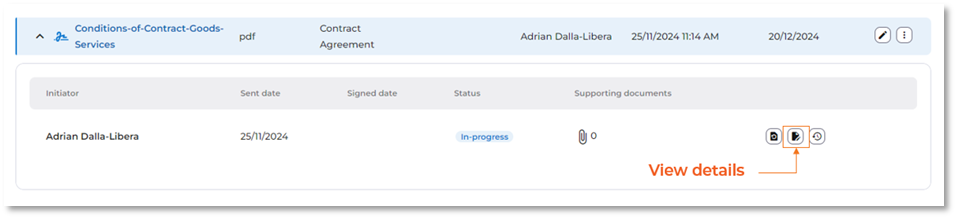
This will bring up a view indicating the list of signers, who has signed and the dates it occurred.
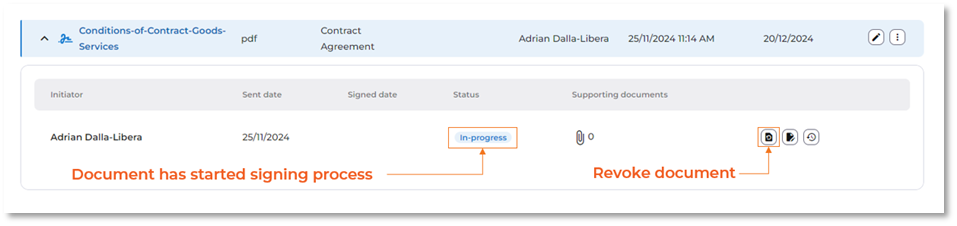
Revoking a document
After the document has been sent but before signing is completed, the initiator can revoke it by clicking the ‘Revoke document’ button. Justification for revoking is required to complete this process, and signers will be notified of the document’s revocation and the reason behind it. The document’s status will then change to ‘Revoked’.
The initiator can subsequently make any typical edits available before sending it for signatures again, including removing the document, editing signers, supporting documentation, and making authoring changes.
Viewing History
A detailed log of all events can be accessed for auditing or troubleshooting purposes by clicking the ‘View history’ button at any time during and after the signing process is completed.
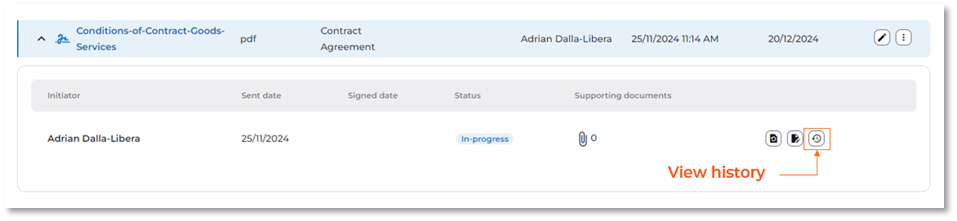
The history will not only include timestamps for when a signer completed their task but will also provide detailed information such as when emails are read, documents are viewed, details are entered, and even any failures that occur.
