Triggers and Schedules

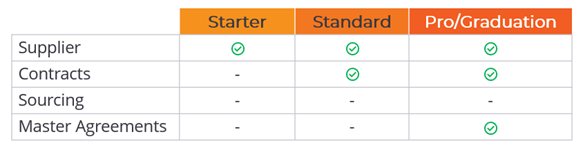
This feature applies to the following subscriptions:
Overview
Triggers (or schedules for Master Agreements) allow users to send emails or assessments either on a recurring basis or as a one-time event. To set up a trigger, you need to specify the recipient, determine the start and end dates (or occurrences), and then define the frequency within that timeframe.
Email triggers
Email triggers can be created for contracts and suppliers, allowing for scheduled emails to be sent to recipients with customizable subjects and bodies.
To create an email trigger from a supplier or contract record:
- Navigate to the ‘Triggers’ section in the side navigation menu.
- Click the '+Trigger' button.
- Provide a descriptive name for the trigger and select ‘Email’ as the ‘Item type’.

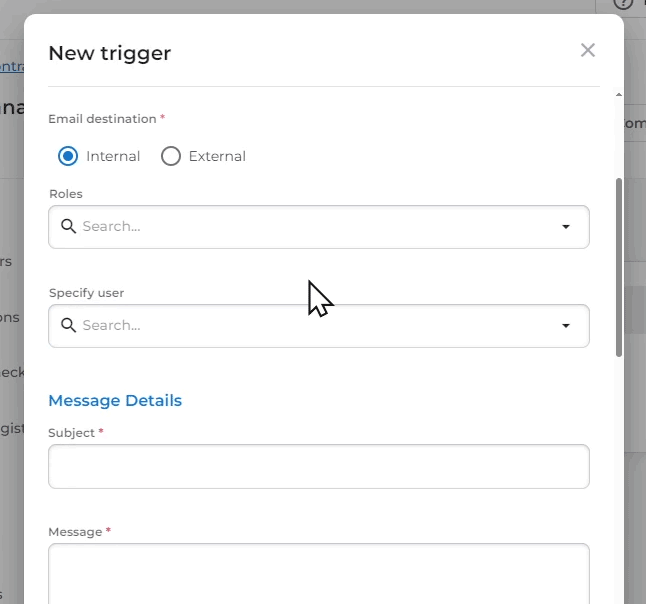
Email destination
Emails can be directed towards individuals within your organisation or to external parties such as suppliers, auditors, and contractors. The choice between internal and external recipients impacts how the ‘Roles’ and ‘Specific user’ fields function below it.
The tables outline the behaviour of the fields for both contract and supplier triggers.
'Internal' Destination
Contracts | Suppliers | |
Roles | Allows a dynamic* selection of the Contract Owner or Contract Manager | Allows a dynamic* selection of the Internal Owner of the supplier |
Specific Users | Shows all users with access to Source to Contract. One or more can be selected. | Shows all users with access to Source to Contract. One or more can be selected. |
*The selection is dynamic, meaning the trigger will automatically update if the user assigned to a role changes after the trigger is created.
'External' Destination
Contracts | Suppliers | |
Roles | Allows selection of users from the ‘Stakeholders’ section of the contract | Allows selection of users from the ‘Contacts & Stakeholders’ section of the Supplier |
Specific Users | Allows one or more email addresses to be entered separated by a colon. | Allows one or more email addresses to be entered separated by a colon. |
Message details
The message details section features fields for both the subject and the content of the message, which allows plain text. The message content has a maximum limit of 4,000 characters, and you can find a character count displayed in the bottom right corner of the message field.
Frequency
The frequency settings enable you to manage email sending over a specified duration, with a minimum interval of one month, which can be extended to any number of months.
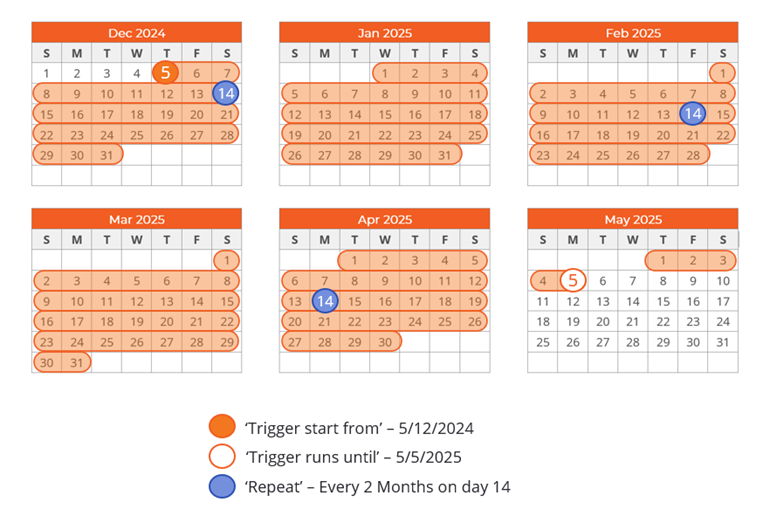
The ‘Trigger runs from’ and ‘Trigger runs until’ fields define the timeframe for the monthly recurrence. ‘Repeat’ fields require you to define a day within the trigger month.
The example below illustrates the duration of trigger eligibility, beginning on December 5th and concluding on May 5th, with a recurrence occurring on the 15th of every second month.
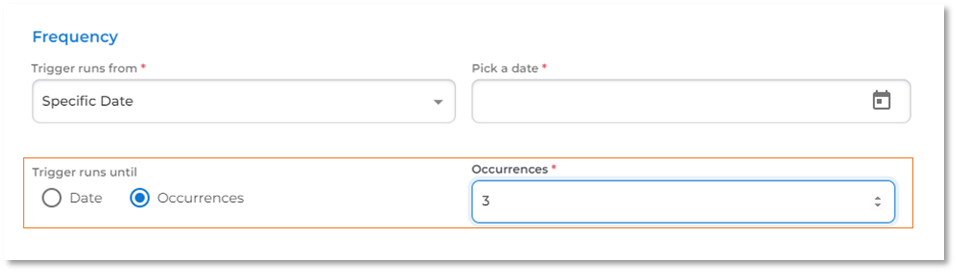
The schedule of a trigger can also be controlled by occurrences. Selecting the ‘Trigger runs until’ radio button as ‘Occurrences’ allows you to select a number of occurrences, the minimum being one.
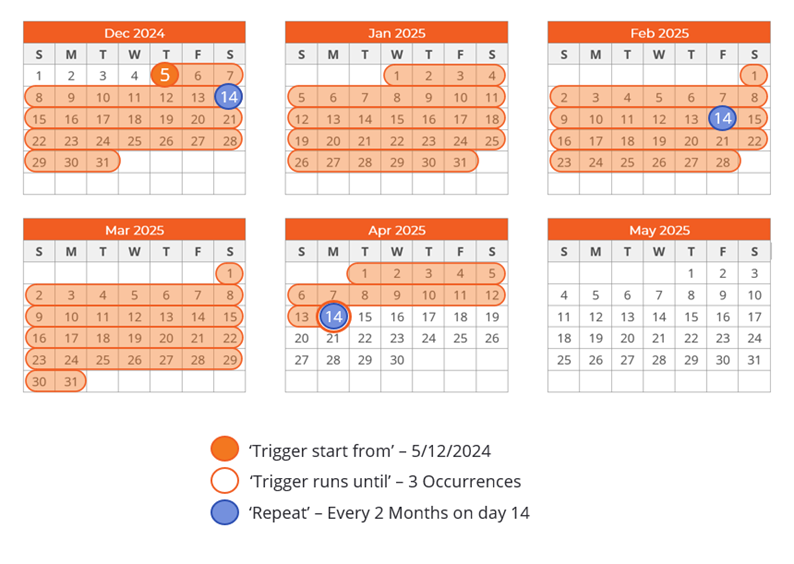
The example below illustrates the same scenario as the previous one, but with the schedule concluding after three occurrences.
When utilising triggers with contracts, you also have the option to use the contract’s start and end dates as either the ‘from’ or ‘until’ date.
For instance, we might have a three-year contract, but there could be a need to set up quarterly email notifications that begin only after the first year has elapsed. Another example could involve contract closure, where a notification is sent one month after the contract ends.
Previews
Before creating a trigger, you can preview it to ensure that the rules behave as intended. First, make sure all frequency fields are filled out, then click the ‘Preview trigger items’ button. A list of all the trigger dates will be displayed in the area below.

Managing triggers
After creating a trigger, you can manage it by reviewing, editing, pausing, or deleting it. However, the availability and behaviour of these management functions vary depending on the trigger’s status. Below are the behaviours for pending, running, and ended statuses.
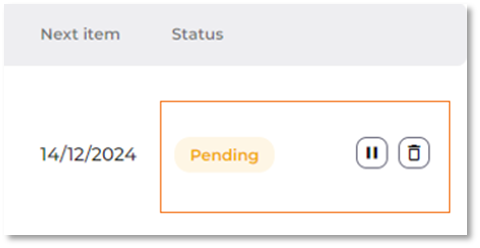
Pending triggers
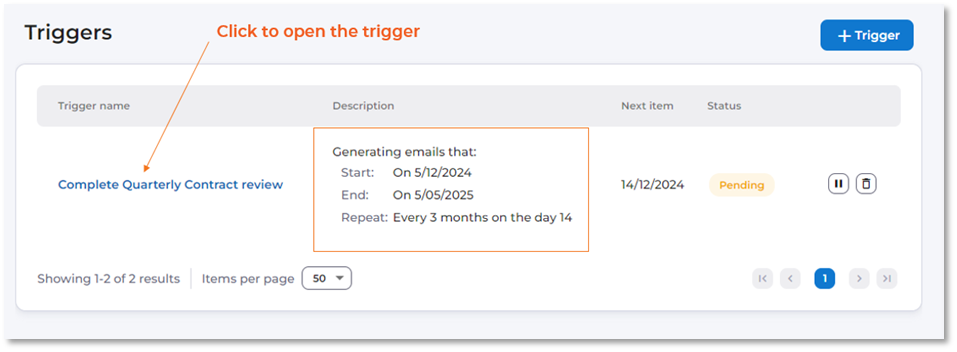
You can manage triggers from the main trigger view. Each created trigger will show a summary of what is being sent and when in the description column. By clicking on the trigger’s title, you can view all its details. If a trigger hasn’t reached its start date, its status will be shown as pending.
After clicking on the title to open a trigger that has a pending status, you will see the detailed trigger configuration form used to create the trigger. All fields can be edited on a pending trigger except:
- Item type
- Email destination
- Roles & specify user
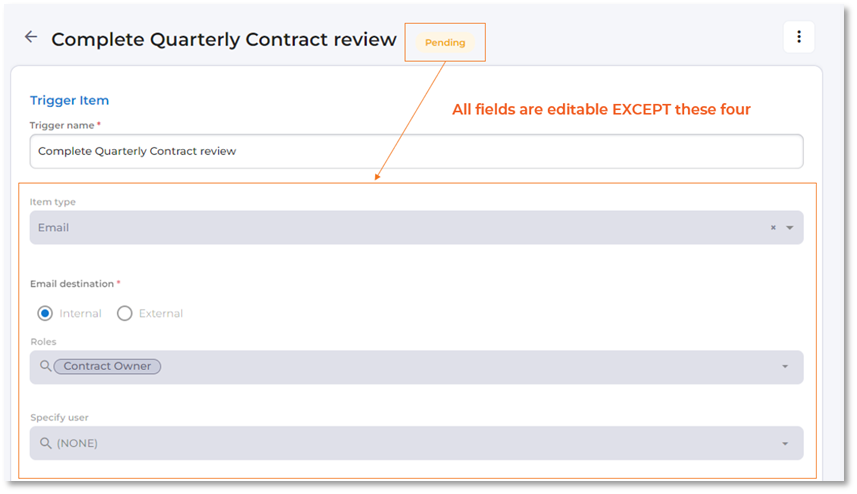
Pending triggers can be paused or deleted. When a pending trigger is paused, it won’t send an email on the trigger dates until it is un-paused, deleted, or reaches its end date.
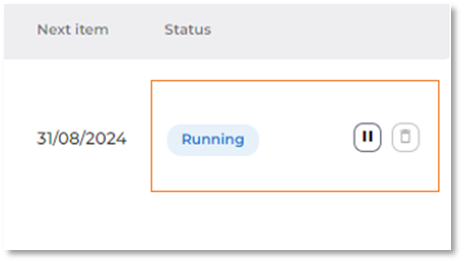
Running triggers
Once a trigger’s start date has passed, its status will change to ‘Running’. When editing a running trigger, the same fields as a pending trigger are locked, as well as the ‘start date’.
Running triggers can be paused but cannot be deleted. When a running trigger is paused, it won’t send an email on the trigger dates until it is un-paused or reaches its end date.
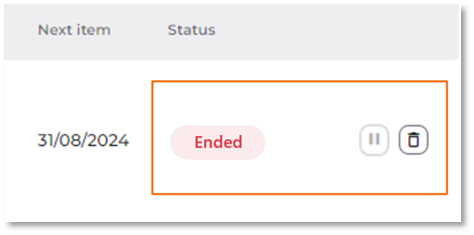
Ended triggers
Once a trigger has reached its end criteria (date or occurrences), the status will change to ‘Ended’ and no fields are editable. Ended triggers can be deleted.